3.5.5.3. 自定义操作类型
在项目中可以创建自己的操作类型或者重载已有的标准类型。
比如,假设需要一个操作显示表格中当前选中实体的实例名称,你还想在多个界面使用,只需要指定相同的操作类型即可。下面的步骤就是如何创建这种操作。
-
创建一个操作类并使用需要的操作类型添加
@ActionType注解:package com.company.sample.web.actions; import com.haulmont.cuba.core.entity.Entity; import com.haulmont.cuba.core.global.MetadataTools; import com.haulmont.cuba.gui.ComponentsHelper; import com.haulmont.cuba.gui.Notifications; import com.haulmont.cuba.gui.components.ActionType; import com.haulmont.cuba.gui.components.Component; import com.haulmont.cuba.gui.components.actions.ItemTrackingAction; import javax.inject.Inject; @ActionType("showSelected") public class ShowSelectedAction extends ItemTrackingAction { @Inject private MetadataTools metadataTools; public ShowSelectedAction(String id) { super(id); setCaption("Show Selected"); } @Override public void actionPerform(Component component) { Entity selected = getTarget().getSingleSelected(); if (selected != null) { Notifications notifications = ComponentsHelper.getScreenContext(target).getNotifications(); notifications.create() .withType(Notifications.NotificationType.TRAY) .withCaption(metadataTools.getInstanceName(selected)) .show(); } } } -
在
web-spring.xml文件中,添加<gui:actions>元素,其base-packages属性指向查找带注解操作的包名:<beans ... xmlns:gui="http://schemas.haulmont.com/cuba/spring/cuba-gui.xsd"> <!-- ... --> <gui:actions base-packages="com.company.sample.web.actions"/> </beans> -
现在可以在界面描述中指定操作类型使用该操作:
<groupTable id="customersTable">
    <actions>
        <action id="show" type="showSelected"/>
    </actions>
    <columns>
        <!-- ... -->
    </columns>
    <buttonsPanel>
        <button action="customersTable.show"/>
    </buttonsPanel>
</groupTable>
|
如果需要重载已有类型,只需要使用相同的名称注册新的操作即可。 |
- CUBA Studio 支持和自定义操作的可配置属性
项目中实现的自定义操作类型可以集成到 CUBA Studio 的界面设计器中。界面设计器提供如下支持:
-
支持在标准操作的列表中选择自定义操作,可以从工具箱(palette)选择,或者为表格通过 +Add → Action 方式添加。
-
支持从操作的使用处切换至操作类定义处的快速代码跳转。在界面 xml 描述中,当光标在 action type 时,通过按下 Ctrl + B 或者按下 ctrl 用鼠标点击类型名时,会自动跳转到操作类定义代码。比如,在这段 xml
<action id="sel" type="showSelected">中,可以点击showSelected。 -
支持在 Component Inspector 面板编辑用户定义的操作属性。
-
支持生成操作提供的事件处理器和方法代理,以实现自定义逻辑。
-
支持泛型参数。泛型根据表格(操作的所属组件)使用的实体类确定。
@com.haulmont.cuba.gui.meta.StudioAction 注解用来标注包含自定义属性的自定义操作类。自定义操作需要用该注解标注,但是目前 Studio 还不使用 @StudioAction 注解的任何属性。
@com.haulmont.cuba.gui.meta.StudioPropertiesItem 注解用来标注操作属性的 setter,表示该属性可编辑。这些属性会在界面编辑器的 Component Inspector 面板展示并编辑。该注解有如下属性:
-
name- xml 中该属性应该写的名称。如果未设置,则会从 setter 方法名生成。 -
type- 属性类型。这个字段在 Inspector 面板使用,为属性创建合适的输入组件并提供建议和基本验证。所有的属性类型参阅 这里。 -
caption- 展示在 Inspector 面板该属性的名称。 -
description- 属性描述,在 Inspector 面板鼠标悬浮于该字段时显示。 -
category- Inspector 面板中属性的分类(目前还没用上)。 -
required- 表名属性是必须字段,此时 Inspector 面板不允许用户输入空值。 -
defaultValue- 默认值,当 xml 属性为配置该字段时默认使用的值。默认值在 xml 中不可见。 -
options- 操作属性的可选项。比如,对于ENUMERATION - 枚举属性类型。
注意,操作属性只支持部分 Java 类型:
-
基础类型:
String,Boolean,Byte,Short,Integer,Long,Float,Double。 -
枚举。
-
java.lang.Class。 -
上面提到类型的
java.util.List。这种类型在 Inspector 面板没有特定的输入组件,所以需要用字符串形式输入并标记为PropertyType.STRING
示例
private String contentType = "PLAIN";
private Class<? extends Screen> dialogClass;
private List<Integer> columnNumbers = new ArrayList<>();

@StudioPropertiesItem(name = "ctype", type = PropertyType.ENUMERATION, description = "Email content type", (1)
        defaultValue = "PLAIN", options = {"PLAIN", "HTML"}
)
public void setContentType(String contentType) {
    this.contentType = contentType;
}

@StudioPropertiesItem(type = PropertyType.SCREEN_CLASS_NAME, required = true) (2)
public void setDialogClass(Class<? extends Screen> dialogClass) {
    this.dialogClass = dialogClass;
}

@StudioPropertiesItem(type = PropertyType.STRING) (3)
public void setColumnNumbers(List<Integer> columnNumbers) {
    this.columnNumbers = columnNumbers;
}| 1 | - 字符串属性,有默认值和有限的几个选项。 |
| 2 | - 必要属性,选项局限于项目中定义的界面类。 |
| 3 | - 整数列表,属性类型设置为 STRING,因为 Inspector 面板没有合适的输入组件。 |
Studio 还提供对于自定义操作中事件和代理方法的支持。支持方式与 CUBA 自带的 UI 组件一样。在操作类中声明事件监听器或代理方法时,不需要任何注解。示例:
- 自定义操作示例:SendByEmailAction
该示例展示了:
-
声明并标注自定义操作类。
-
标注操作的可编辑属性。
-
声明操作产生的事件及其处理器。
-
声明操作的代理方法。
SendByEmailAction 操作通过 email 发送实体信息,实体为其所属表格中选中的实体。这个操作是高度可配置的,因为大部分内部逻辑可以通过属性、代理方法和事件修改。
操作源码:
@StudioAction(category = "List Actions", description = "Sends selected entity by email") (1)
@ActionType("sendByEmail") (2)
public class SendByEmailAction<E extends Entity> extends ItemTrackingAction { (3)

    private final MetadataTools metadataTools;
    private final EmailService emailService;

    private String recipientAddress = "admin@example.com";

    private Function<E, String> bodyGenerator;
    private Function<E, List<EmailAttachment>> attachmentProvider;

    public SendByEmailAction(String id) {
        super(id);
        setCaption("Send by email");
        emailService = AppBeans.get(EmailService.NAME);
        metadataTools = AppBeans.get(MetadataTools.NAME);
    }

    @StudioPropertiesItem(required = true, defaultValue = "admin@example.com") (4)
    public void setRecipientAddress(String recipientAddress) {
        this.recipientAddress = recipientAddress;
    }

    public Subscription addEmailSentListener(Consumer<EmailSentEvent> listener) { (5)
        return getEventHub().subscribe(EmailSentEvent.class, listener);
    }

    public void setBodyGenerator(Function<E, String> bodyGenerator) { (6)
        this.bodyGenerator = bodyGenerator;
    }

    public void setAttachmentProvider(Function<E, List<EmailAttachment>> attachmentProvider) { (7)
        this.attachmentProvider = attachmentProvider;
    }

    @Override
    public void actionPerform(Component component) {
        if (recipientAddress == null || bodyGenerator == null) {
            throw new IllegalStateException("Required parameters are not set");
        }

        E selected = (E) getTarget().getSingleSelected();
        if (selected == null) {
            return;
        }

        String caption = "Entity " + metadataTools.getInstanceName(selected) + " info";
        String body = bodyGenerator.apply(selected); (8)
        List<EmailAttachment> attachments = attachmentProvider != null ? attachmentProvider.apply(selected) (9)
                : new ArrayList<>();

        EmailInfo info = EmailInfoBuilder.create()
                .setAddresses(recipientAddress)
                .setCaption(caption)
                .setBody(body)
                .setBodyContentType(EmailInfo.TEXT_CONTENT_TYPE)
                .setAttachments(attachments.toArray(new EmailAttachment[0]))
                .build();

        emailService.sendEmailAsync(info); (10)

        EmailSentEvent event = new EmailSentEvent(this, info);
        eventHub.publish(EmailSentEvent.class, event); (11)
    }

    public static class EmailSentEvent extends EventObject { (12)
        private final EmailInfo emailInfo;

        public EmailSentEvent(SendByEmailAction origin, EmailInfo emailInfo) {
            super(origin);
            this.emailInfo = emailInfo;
        }

        public EmailInfo getEmailInfo() {
            return emailInfo;
        }
    }
}| 1 | - 用 @StudioAction 注解的操作类。 |
| 2 | - 用 @ActionType 设置操作类型。 |
| 3 | - 操作类有 E 泛型参数 - 表示在所属表格中存储的实体类型 |
| 4 | - email 收件人地址用操作属性开放出来。 |
| 5 | - 为 EmailSentEvent 事件添加监听器的方法。Studio 检测出该方法作为操作的事件处理器。 |
| 6 | - 设置代理 Function 对象的方法,将生成邮件体的逻辑代理给界面控制器。Studio 检测该方法作为操作的代理方法。 |
| 7 | - 声明其他代理方法 - 例子中是将创建附件的咯及代理出去。注意,这里两个代理方法都用了 E 泛型参数。 |
| 8 | - 在界面控制器必须实现的代理方法,生成邮件体。 |
| 9 | - 如果设置了的话,调用可选的代理方法创建附件。 |
| 10 | - 真正发送邮件的地方。 |
| 11 | - 邮件发送成功后发布 EmailSentEvent 事件,如果界面控制器订阅了该事件,则会调用对应的事件处理器。 |
| 12 | - 声明事件类,注意,这里可以为事件类添加更多字段,将有用的信息传递给事件处理逻辑。 |
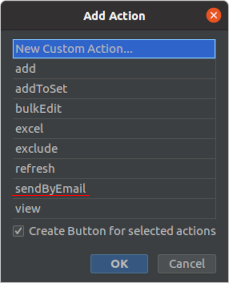
用上面示例的方式完成代码后,Studio 会在创建操作的界面与标准操作一同显示新的自定义操作:
为界面描述添加操作之后,可以在 Component Inspector 面板选择并修改其属性:
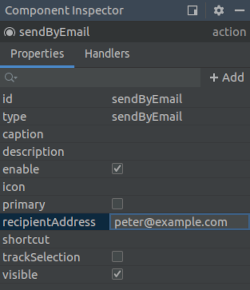
自定义操作的属性在 Inspector 修改后,会用下面的格式写入界面描述文件:
<action id="sendByEmail" type="sendByEmail">
    <properties>
        <property name="recipientAddress" value="peter@example.com"/>
    </properties>
</action>
Component Inspector 面板也同样会显示操作的事件处理器和代理方法,用来生成相应代码:
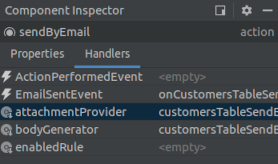
在界面控制器使用生成代理方法和事件处理器代码的示例:
@UiController("sales_Customer.browse")
@UiDescriptor("customer-browse.xml")
@LookupComponent("customersTable")
@LoadDataBeforeShow
public class CustomerBrowse extends StandardLookup<Customer> {

    @Inject
    private Notifications notifications;

    @Named("customersTable.sendByEmail")
    private SendByEmailAction<Customer> customersTableSendByEmail; (1)

    @Subscribe("customersTable.sendByEmail")
    public void onCustomersTableSendByEmailEmailSent(SendByEmailAction.EmailSentEvent event) { (2)
        notifications.create(Notifications.NotificationType.HUMANIZED)
                .withCaption("Email sent")
                .show();
    }

    @Install(to = "customersTable.sendByEmail", subject = "bodyGenerator")
    private String customersTableSendByEmailBodyGenerator(Customer customer) { (3)
        return "Hello, " + customer.getName();
    }

    @Install(to = "customersTable.sendByEmail", subject = "attachmentProvider")
    private List<EmailAttachment> customersTableSendByEmailAttachmentProvider(Customer customer) { (4)
        return Collections.emptyList();
    }
}| 1 | - 操作的注入点使用正确的类型参数。 |
| 2 | - 事件处理器实现。 |
| 3 | - 代理方法 bodyGenerator 实现。方法签名使用了 Customer 类型参数。 |
| 4 | - 代理方法 attachmentProvider 的实现。 |