5.3.8. 部署至 Jelastic Cloud
下面是构建应用程序并部署至 Jelastic 云的示例。
|
注意,目前只支持使用 PostgreSQL 或者 HSQL 数据库的项目。 |
-
首先,浏览器打开 Jelastic 云创建一个免费的测试账号。
-
创建一个将要部署应用程序 WAR 的新环境:
-
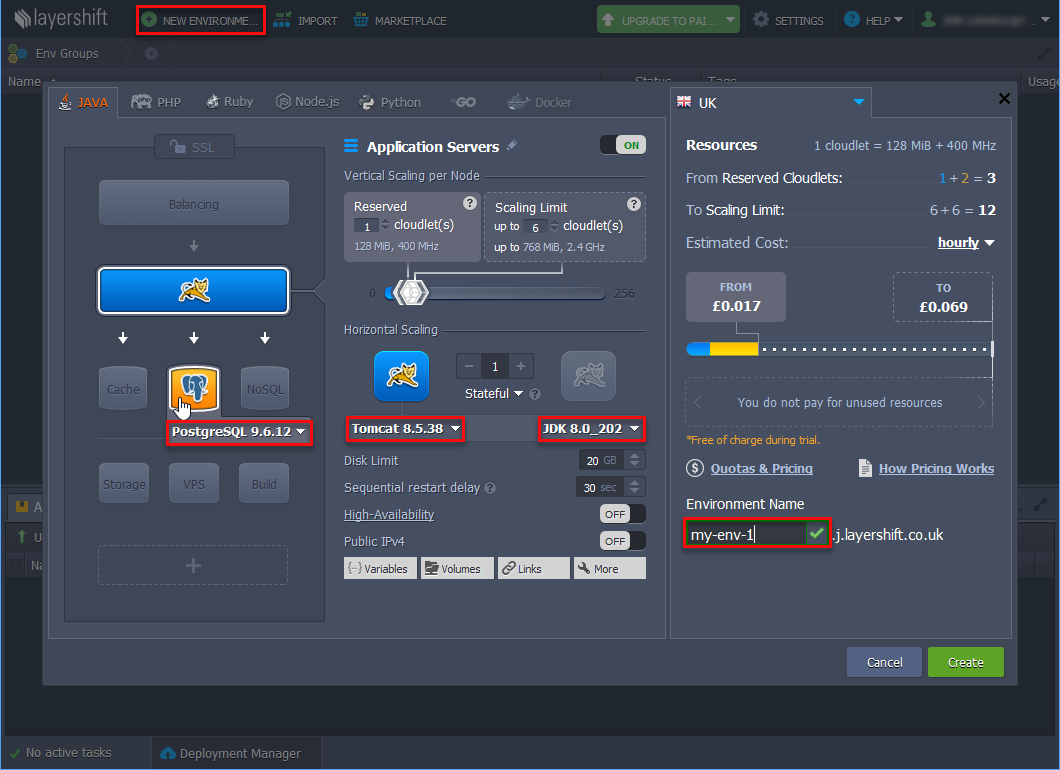
点击 New Environment。

-
在显示的窗口中指定配置的值:兼容性强的环境需要有 Java 8,Tomcat 8 以及 PostgreSQL 9.1+(如果项目使用 PostgreSQL 的话)。在 Environment Name 字段,设置一个唯一的环境名称并点击 Create。
-
如果创建的环境使用 PostgreSQL,你会收到一封带有数据库连接信息的 email。使用 email 里面的链接打开数据库管理界面,然后创建一个空数据库。数据库名称可以稍后在自定义的
context.xml文件设置。
-
-
使用 CUBA Studio 构建 Single WAR 文件:
-
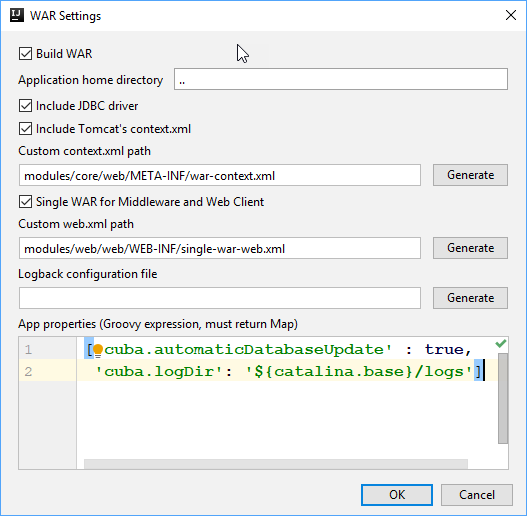
在主菜单选择 CUBA > Deployment > WAR Settings。
-
勾选 Build WAR 复选框。
-
在 Application home directory 字段输入
..。 -
勾选 Include JDBC driver 和 Include Tomcat’s context.xml 复选框。
-
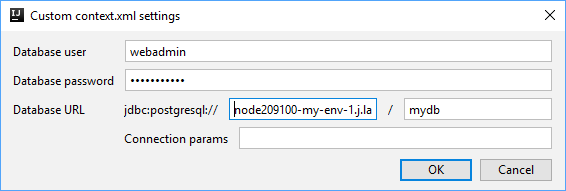
如果项目使用了 PostgreSQL,点击 Custom context.xml path 旁边的 Generate 按钮。设置数据库的用户名、密码、主机以及之前创建的数据库名。

-
勾选 Single WAR for Middleware and Web Client 复选框。
-
点击 Custom web.xml path 旁边的 Generate 按钮。Studio 将会生成一个特殊的单一 WAR
web.xml,组合了中间件和 Web 客户端应用程序 block。
-
在 App properties 字段填写
cuba.logDir属性:appProperties = ['cuba.automaticDatabaseUpdate': true, 'cuba.logDir': '${catalina.base}/logs'] -
点击 OK 按钮。Studio 会在
build.gradle文件添加 buildWar 任务。task buildWar(type: CubaWarBuilding) { includeJdbcDriver = true includeContextXml = true appProperties = ['cuba.automaticDatabaseUpdate': true, 'cuba.logDir' : '${catalina.base}/logs'] webXmlPath = 'modules/web/web/WEB-INF/single-war-web.xml' appHome = '..' coreContextXmlPath = 'modules/core/web/META-INF/war-context.xml' } -
如果项目使用的 HSQLDB,在
build.gradle中找到buildWar任务,然后添加hsqlInProcess = true属性,这样可以在部署 WAR 文件的时候运行嵌入的 HSQL 服务。确保没有设置coreContextXmlPath属性。task buildWar(type: CubaWarBuilding) { appProperties = ['cuba.automaticDatabaseUpdate': true, 'cuba.logDir': '${catalina.base}/logs'] appHome = '..' includeContextXml = true webXmlPath = 'modules/web/web/WEB-INF/single-war-web.xml' includeJdbcDriver = true hsqlInProcess = true } -
命令行运行
buildWar启动构建过程:gradlew buildWar最后,会在
build\distributions\war项目子文件夹创建app.war。
-
-
使用 部署 War Gradle 任务将 WAR 文件部署至 Jelastic。
task deployWar(type: CubaJelasticDeploy, dependsOn: buildWar){ email = **** password = **** hostUrl = 'app.j.layershift.co.uk' environment = 'my-env-1' } -
部署过程完成后,应用程序已经在 Jelastic 云上可用了。在浏览器输入
<environment>.<hostUrl>即可打开项目。比如:
http://my-env-1.j.layershift.co.uk也可以用 Jelastic 环境面板的 Open in Browser 按钮打开应用程序。
